April 3, 2022
Concentration normalization is boring. There, I said it. And I should know: I’ve had to do it more times than I care to remember. In fact, it’s probably one of the most tedious aspects of lab work. But did you know there’s a way you can do it in a fraction of the time? It’s true, and we thought we’d show you how in the best way possible: A race.
My colleagues Jacqueline and Fatima went head to head in the lab. Jacqueline tried to normalize 96 samples to the same concentration the old-fashioned (read "manual") way, and Fatima did the same exercise using the digital experiment platform, Synthace.
Want the TL;DR? Fatima won, hands down, proving that Synthace can help you normalize samples 5 times faster.
Want the longer version? Stick around! We’re going to cover:
- What concentration normalization is, and why it’s so hard
- How to automate normalization with the right software and hardware
- What happened during our "normalization race" (including a video of our efforts)
- What all of this means for the future of lab work
Let’s get into it!
What is concentration normalization?
The goal is simple: Take a list of samples and make them all the same concentration or volume. In other words, concentration normalization is where you dilute an entire set of samples so that they're the same concentration, typically before using them for something else later on.
This is often a prerequisite for getting reliable high-quality data. Common applications include steps in next-generation sequencing, cDNA synthesis, qPCR/dPCR, or various protein assays.
When you work in a lab, it’s a ‘bread and butter’ protocol—one you’ll run fairly often. But it’s also one of the harder, more tedious things to get right 100% of the time.
And that’s a problem.
Why is concentration normalization so hard?
Any scientist dreads normalizing samples, especially in large numbers.
Here’s why:
- Every sample needs a different pipetting volume, down to 0.01 uL, which can be nerve-wracking and tiring to get right each and every time
- Dealing with samples in plates makes it really hard (if not impossible) to check which samples have already been normalized
- It takes a long time and needs constant focus, which is difficult in busy, distraction-filled lab environments
All things considered, it’s an error-prone, cumbersome, and tiring piece of work.
The worst part? If you get something wrong, you likely won’t know about it until you get further on in your work. And that can only mean one thing: Starting from scratch.
How to automate the concentration normalization process
What’s better than normalizing samples yourself?
Getting a robot to do it.
Trouble is, writing the code you need to do this can be difficult, time-consuming, or just not something you’re able to do. Isn’t it better to spend more time working on the science itself, anyway?
We think so. Our secret weapon here is, of course, the Synthace platform.
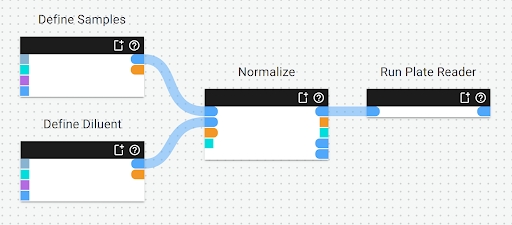
Making the above workflow takes only a few minutes.
You can simulate these steps in advance but, when you hit ‘schedule’ to run it in your lab, this is when the magic really happens.
Here’s what the Synthace platform does
It...
- Automatically calculates your required dilutions
- Plans optimized pipetting actions on your robot
- Writes the machine code needed to instruct your robot (a Tecan Evo, in my case)
- Executes the workflow while you go off and work on something else
The burden of calculating and programming the robot disappears.
The tiring, error-prone, soul-crushing job of manually pipetting potentially hundreds of unique volumes is given to a robot that won’t get distracted by someone asking if they want to grab lunch.
With a fraction of the hands-on time as someone doing the same thing manually, your samples are safeguarded and ready to use downstream.
Head to head: Jacqueline's manual pipetting vs Fatima's automated normalization
Jacqueline was tasked with normalizing 96 samples to the same concentration manually.
Before she could head to the lab and start pipetting, she had to create a spreadsheet to calculate the volume that she'll have to pipette for each sample.
Meanwhile, Fatima skipped the grunt work and saved herself time by normalizing the samples automatically with Synthace. First, she used the platform to generate a simple workflow defining the samples that she wanted to normalize. This generated a simulation of the experiment, allowing her to visualize the entire process before it happened. She then sent the simulation to the lab, where she executed normalized her samples on a Hamilton STAR in the lab.
As Jacqueline cracked on with the manual pipetting, normalizing her samples one by one, Fatima was ready to start the automated execution.
After just 12 minutes, the Hamilton STAR completed the normalization and transported the plate to the plate reader to measure absorbance. The data from the plate reader was automatically uploaded to the Synthace platform, where it was linked to Fatima's normalization protocol.
While Fatima relaxed, her job done for the day, Jacqueline was still pipetting. Eighty minutes later, Jacqueline finally completed the manual normalization. She used the same plate reader to measure the absorbance of the samples, collected the data and emailed it to herself.
So what were the results?
Jacqueline's manual normalization took 95 minutes and required 80 minutes of hands-on time. Fatima's automatic normalization, made possible using Synthace, was complete in 27 minutes and required just 15 minutes of hands on time.
This demonstrates how Synthace can significantly improve the efficiency of lab experiments.
How to normalize concentrations with minimal fuss
Although this was a fun way to prove a point, there’s a lot at stake here. Being able to work like Fatima was able to is a game-changer for biologists, and it’s not limited to normalization. This way of working applies to all lab work:
- Simpler to do high throughput work
- Increased complexity becomes easier
- Much less time spent on tedious lab work
- More time spent doing everything else you’re interested in
These kinds of changes compound over time. More complex runs, more runs in a day, a week, a month, a year… more time to think about the next challenge, more chance of moving faster to your next breakthrough… it all adds up.
If you could work like this with everything you do in your lab, what would it mean for you?
Tag(s):
Lab automation